> ## Documentation Index
> Fetch the complete documentation index at: https://docs.anchorbrowser.io/llms.txt
> Use this file to discover all available pages before exploring further.
# Automation Tasks Overview
> See how Automation Tasks work in the Anchor UI — demonstrate a flow, inspect the workflow, run it step by step, and apply self-healing fixes when sites change.
Automation Tasks let you automate any website workflow — download a report, fill a form, extract data — and run it reliably in production. You define the task once in the [Anchor UI](https://app.anchorbrowser.io/tools), then call it from your app or run it on demand.
This page walks through the main capabilities with screenshots from the product. For API integration, see [Creating a Task](/tasks/creating-a-task) and [Run a Task](/tasks/run-a-task).
## Create from a prompt or demonstration
There are two ways to create a task:
* **Prompt** — describe what the task should do in natural language (objective, start URL, steps, and expected output).
* **Demonstration** — perform the task once in a live browser while Anchor records your actions.
Both produce the same result: a versioned workflow you can test, edit, and deploy.
### Demonstrate the task
During creation, choose to demonstrate the task manually. A live browser opens at your start URL. As you navigate, click, and fill forms, Anchor captures every event in the sidebar.
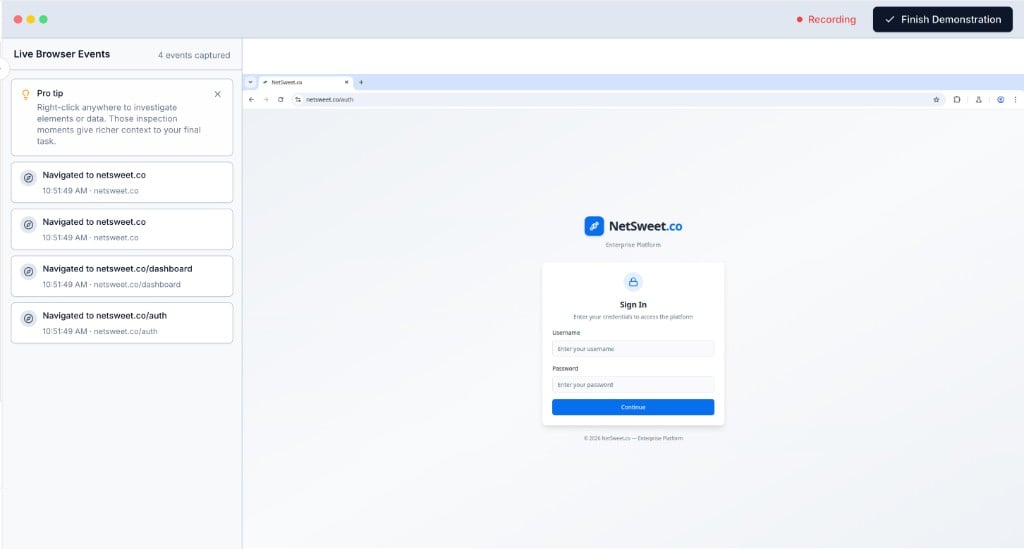 Right-click anywhere in the browser to inspect elements or data. Those moments give Anchor richer context when building the final task.
When you're done, click **Finish Demonstration**. Anchor compiles your actions into a repeatable workflow.
You can also send a [shareable demonstration link](/advanced/demonstrations-api) to someone outside your workspace.
### Describe it in a prompt
Prefer writing over clicking? Describe the task on the **Task Definition** step — what site to open, what to do, which values change between runs (`{{report_name}}`, `{{email}}`, and so on), and what to return. Anchor generates the workflow from your description.
See [Creating a Task](/tasks/creating-a-task#create-from-a-prompt) for a prompt template and examples.
## The workflow page
The **Workflow** tab is where you understand and refine how a task actually works. Anchor compiles your prompt or demonstration into a graph of segments — each segment is a discrete step with its own behavior, inputs, and outputs.
| Step type | What it does |
| ----------- | ---------------------------------------------------------------------------------------------------------------------- |
| **UI** | Interact with the page — navigate, click, fill forms, extract visible content. The default for most actions. |
| **Network** | Read data from API responses captured during the session. Use when the response payload is more reliable than the DOM. |
| **Logic** | Deterministic checks and control flow with no AI fallback — validation, hard errors, or branching on known values. |
| **Agent** | AI judgment for subjective decisions — for example choosing the "best" or most relevant match. |
UI and Network steps run Playwright code first and can [fall back to AI](/advanced/self-healing#ai-fallback) if that code fails. Logic steps never fall back. Agent steps are AI-only. See [Code Tasks](/advanced/legacy-tasks#segment-types) for the full schema reference.
Right-click anywhere in the browser to inspect elements or data. Those moments give Anchor richer context when building the final task.
When you're done, click **Finish Demonstration**. Anchor compiles your actions into a repeatable workflow.
You can also send a [shareable demonstration link](/advanced/demonstrations-api) to someone outside your workspace.
### Describe it in a prompt
Prefer writing over clicking? Describe the task on the **Task Definition** step — what site to open, what to do, which values change between runs (`{{report_name}}`, `{{email}}`, and so on), and what to return. Anchor generates the workflow from your description.
See [Creating a Task](/tasks/creating-a-task#create-from-a-prompt) for a prompt template and examples.
## The workflow page
The **Workflow** tab is where you understand and refine how a task actually works. Anchor compiles your prompt or demonstration into a graph of segments — each segment is a discrete step with its own behavior, inputs, and outputs.
| Step type | What it does |
| ----------- | ---------------------------------------------------------------------------------------------------------------------- |
| **UI** | Interact with the page — navigate, click, fill forms, extract visible content. The default for most actions. |
| **Network** | Read data from API responses captured during the session. Use when the response payload is more reliable than the DOM. |
| **Logic** | Deterministic checks and control flow with no AI fallback — validation, hard errors, or branching on known values. |
| **Agent** | AI judgment for subjective decisions — for example choosing the "best" or most relevant match. |
UI and Network steps run Playwright code first and can [fall back to AI](/advanced/self-healing#ai-fallback) if that code fails. Logic steps never fall back. Agent steps are AI-only. See [Code Tasks](/advanced/legacy-tasks#segment-types) for the full schema reference.
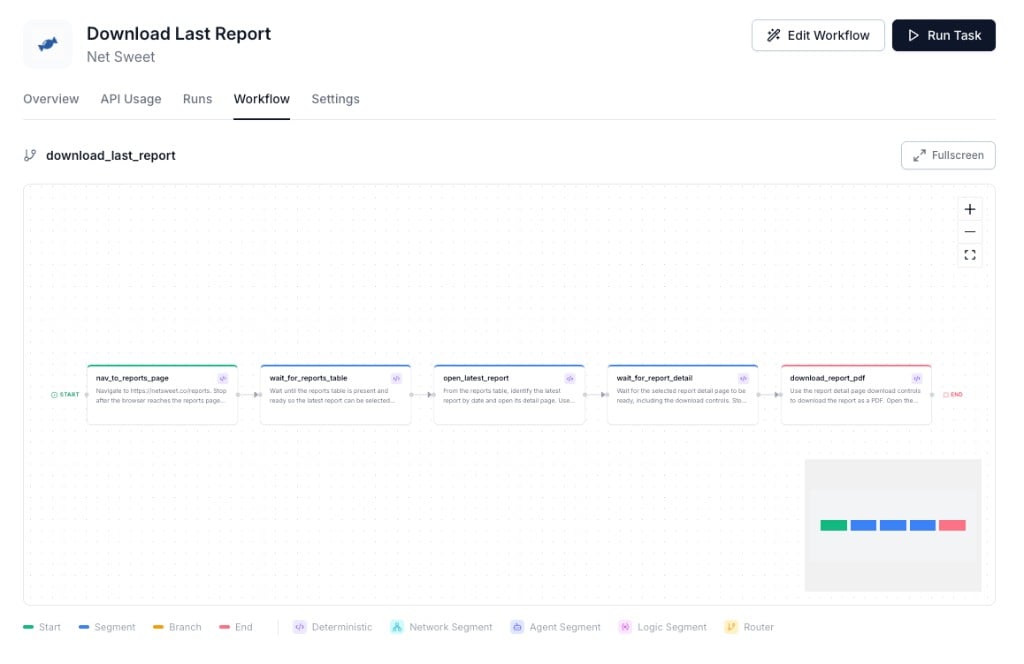 **Inspect any step.** Click a segment on the graph to open its detail panel. You'll see the prompt that drives the step, its input and output parameters, and — for deterministic segments — the actual Playwright code that runs when the task executes. Agent, logic, and network segments show their respective configuration instead. This is how you verify what Anchor generated and understand why a step behaves the way it does.
**Edit step code directly.** From the detail panel, click the pencil icon on a segment's deterministic code to open the snippet editor. Change selectors, add waits, or adjust logic — then save as a draft and test before publishing.
**Edit the whole workflow.** Use **Edit Workflow** in the header to describe changes in plain language — for example, "also return the downloaded filename in the output." Anchor applies the change across the workflow and saves it as a draft version.
**Run and version.** Click **Run Task** to test the current version with real inputs. The **Runs** tab lists every past execution; **Settings** controls identity, human-in-the-loop, and default browser configuration.
See [Code Tasks — Manually editing workflow JSON](/advanced/legacy-tasks#manually-editing-workflow-json) for hand-editing the full workflow JSON via API.
## Run a task
Starting a run opens a live execution view. Anchor launches a browser, authenticates if needed, and walks through each segment in order.
**Inspect any step.** Click a segment on the graph to open its detail panel. You'll see the prompt that drives the step, its input and output parameters, and — for deterministic segments — the actual Playwright code that runs when the task executes. Agent, logic, and network segments show their respective configuration instead. This is how you verify what Anchor generated and understand why a step behaves the way it does.
**Edit step code directly.** From the detail panel, click the pencil icon on a segment's deterministic code to open the snippet editor. Change selectors, add waits, or adjust logic — then save as a draft and test before publishing.
**Edit the whole workflow.** Use **Edit Workflow** in the header to describe changes in plain language — for example, "also return the downloaded filename in the output." Anchor applies the change across the workflow and saves it as a draft version.
**Run and version.** Click **Run Task** to test the current version with real inputs. The **Runs** tab lists every past execution; **Settings** controls identity, human-in-the-loop, and default browser configuration.
See [Code Tasks — Manually editing workflow JSON](/advanced/legacy-tasks#manually-editing-workflow-json) for hand-editing the full workflow JSON via API.
## Run a task
Starting a run opens a live execution view. Anchor launches a browser, authenticates if needed, and walks through each segment in order.
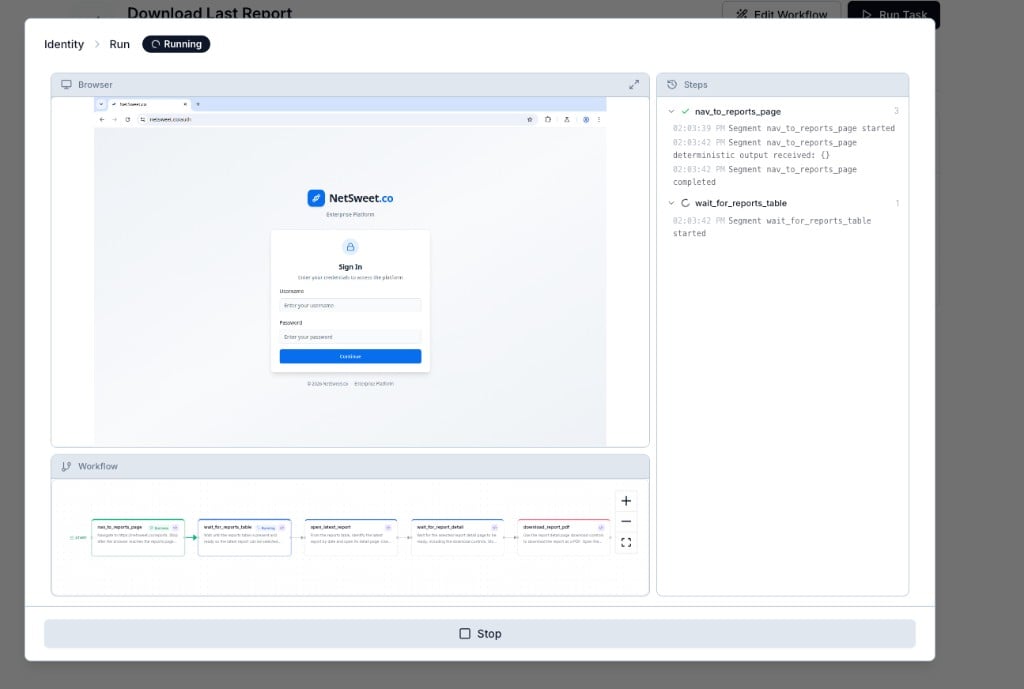 While a run is in progress:
* The **live browser** shows what Anchor is doing on the site right now.
* The **steps panel** streams per-segment logs with timestamps — expand any step to see when it started, completed, or hit an error.
* The **workflow graph** at the bottom highlights each segment as it runs: green for success, spinner for in progress.
Use **Stop** to cancel a run that is still going.
## View a run
Once a run finishes — or when you need to debug a past failure — open it from the **Runs** tab via **View run**. This is the primary tool for understanding what actually happened.
The view-run page uses the same layout as the live run, but swaps the live browser for a **session recording** you can scrub through. Everything is tied to the workflow graph:
* **Replay what happened** — watch the full browser session recording to see exactly what Anchor did on the page.
* **Jump to a step** — click any segment on the graph and the recording seeks to that moment. Pair this with the step logs on the right to pinpoint where things went wrong.
* **Review inputs and output** — see the values passed into the run and the structured data returned (or the error message if it failed).
* **Spot AI fallback** — runs where deterministic code failed but an agent recovered are tagged **AI Fallback**, so you know which steps are fragile.
From a completed run you can also **rerun** with the same inputs, open the underlying **browser session**, or — when self-healing applies — review and apply a suggested fix.
## Self-healing
Websites change. Buttons move, pages load slower, layouts shift. When you're reviewing a run in **View run**, Anchor surfaces what went wrong and how to fix it.
**During a run** — if a step's deterministic code fails, Anchor retries it with an AI agent so the run can still finish. Runs that used this path are tagged **AI Fallback**.
**After a run** — Anchor analyzes execution logs, browser actions, and page snapshots, then suggests a durable fix to the workflow itself.
While a run is in progress:
* The **live browser** shows what Anchor is doing on the site right now.
* The **steps panel** streams per-segment logs with timestamps — expand any step to see when it started, completed, or hit an error.
* The **workflow graph** at the bottom highlights each segment as it runs: green for success, spinner for in progress.
Use **Stop** to cancel a run that is still going.
## View a run
Once a run finishes — or when you need to debug a past failure — open it from the **Runs** tab via **View run**. This is the primary tool for understanding what actually happened.
The view-run page uses the same layout as the live run, but swaps the live browser for a **session recording** you can scrub through. Everything is tied to the workflow graph:
* **Replay what happened** — watch the full browser session recording to see exactly what Anchor did on the page.
* **Jump to a step** — click any segment on the graph and the recording seeks to that moment. Pair this with the step logs on the right to pinpoint where things went wrong.
* **Review inputs and output** — see the values passed into the run and the structured data returned (or the error message if it failed).
* **Spot AI fallback** — runs where deterministic code failed but an agent recovered are tagged **AI Fallback**, so you know which steps are fragile.
From a completed run you can also **rerun** with the same inputs, open the underlying **browser session**, or — when self-healing applies — review and apply a suggested fix.
## Self-healing
Websites change. Buttons move, pages load slower, layouts shift. When you're reviewing a run in **View run**, Anchor surfaces what went wrong and how to fix it.
**During a run** — if a step's deterministic code fails, Anchor retries it with an AI agent so the run can still finish. Runs that used this path are tagged **AI Fallback**.
**After a run** — Anchor analyzes execution logs, browser actions, and page snapshots, then suggests a durable fix to the workflow itself.
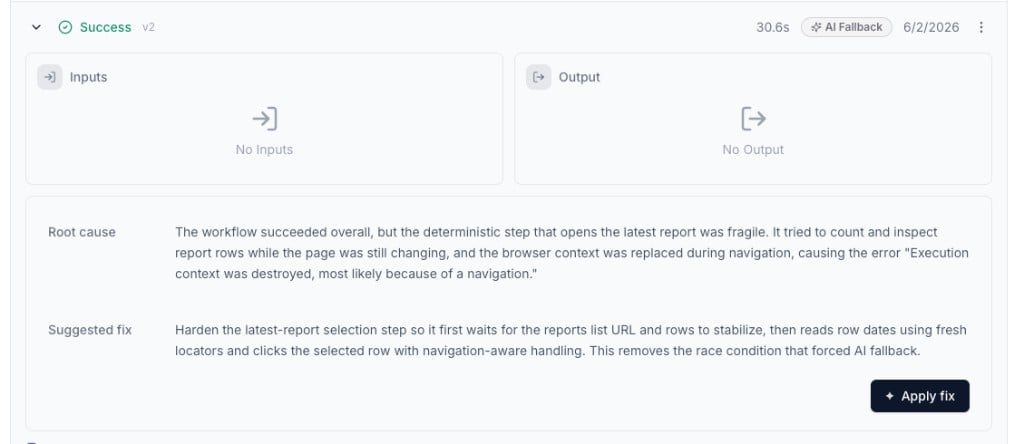 On runs where self-healing applies, you'll see:
* **Root cause** — a plain-language explanation of why the deterministic step failed.
* **Suggested fix** — what Anchor recommends changing so the next run doesn't need AI fallback.
* **Apply fix** — one click to update the workflow with the repair. Test the new version from the Workflow tab, then publish.
Subscribe to the `task.healed` [webhook event](/webhooks/events) to get notified automatically. See [Self-healing](/advanced/self-healing) for the full technical details.
## Next steps
Create tasks from a prompt or demonstration, in the UI and via API.
Execute tasks with inputs, identity, and sync or async modes.
AI fallback during runs and automatic workflow repair after failures.
Browse ready-made tasks in the Anchor library.
On runs where self-healing applies, you'll see:
* **Root cause** — a plain-language explanation of why the deterministic step failed.
* **Suggested fix** — what Anchor recommends changing so the next run doesn't need AI fallback.
* **Apply fix** — one click to update the workflow with the repair. Test the new version from the Workflow tab, then publish.
Subscribe to the `task.healed` [webhook event](/webhooks/events) to get notified automatically. See [Self-healing](/advanced/self-healing) for the full technical details.
## Next steps
Create tasks from a prompt or demonstration, in the UI and via API.
Execute tasks with inputs, identity, and sync or async modes.
AI fallback during runs and automatic workflow repair after failures.
Browse ready-made tasks in the Anchor library.